Showing posts with label Computer Tricks. Show all posts

How to fixed Outlook Express 2GB limit problem


How to solve Outlook Express 2GB limit problem:

Notice: In this example the symptom is that we cannot receive new e-mails because Inbox.dbx file (Inbox folder) has overridden the 2GB storage limit.

Step 1. Find the Outlook Express store folder.

How to Find the Outlook Express store folder:
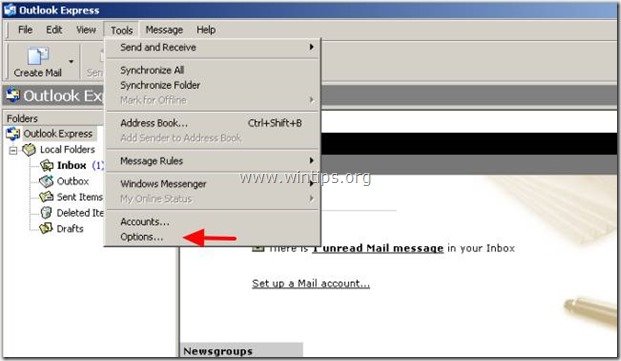
1. From Outlook Express menu, go to: "Tools" > "Options"
outlook-express-options
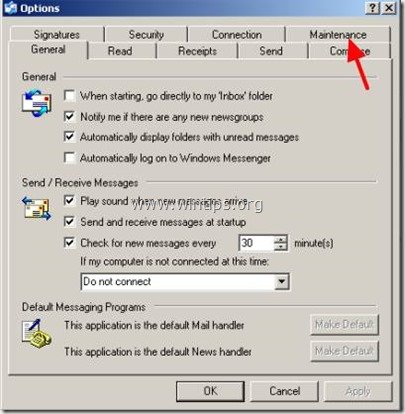
2. In Options menu click the "Maintenance" tab.
outlook express - general options
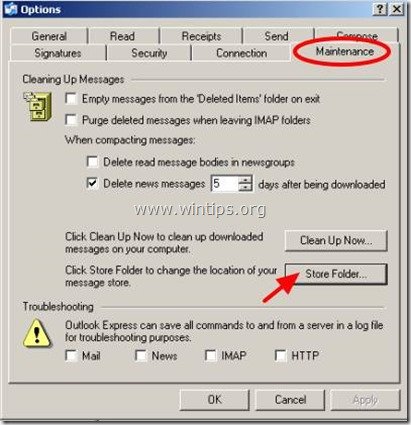
3. In Maintenance tab, click the "Store Folder" button.
outlook express - maintenance - store folder
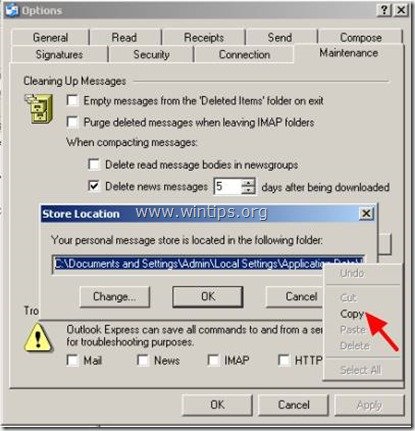
4. Select the entire Outlook Express storage path and then right click on it and select "Copy".
outlook express - store folder path
6. Press "Cancel" twice to exit Outlook Express options and then close all Outlook Express windows.
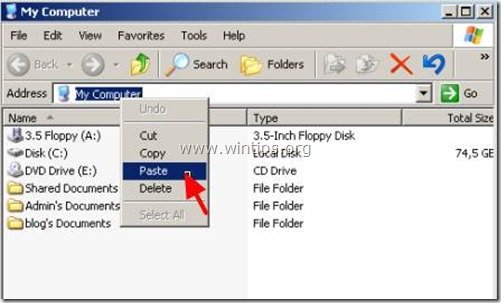
7. Double click to open My computer and in the address bar right click to paste the copied path and then press Enter.
my computer
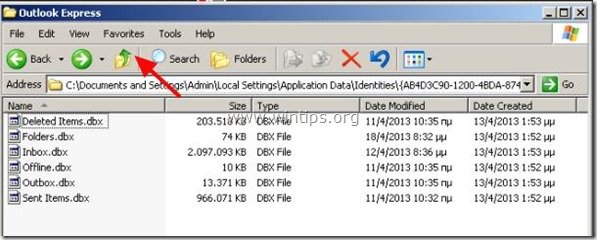
6. From the standard buttons menu toolbar press the "UP" button to go to the parent folder.
outlook express files

Step 2. Take a backup (Copy) of Outlook Express storage folder.

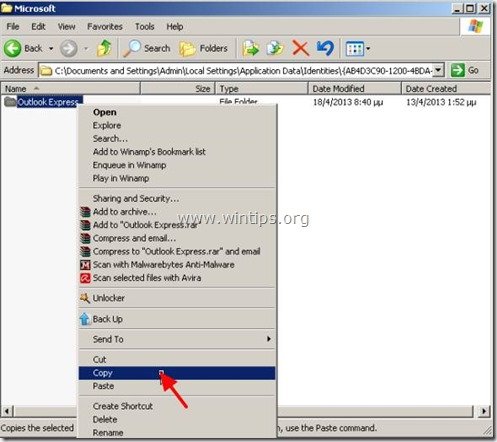
1. Right click on Outlook Express folder and select "Copy".
outlook express folder - wintips.org
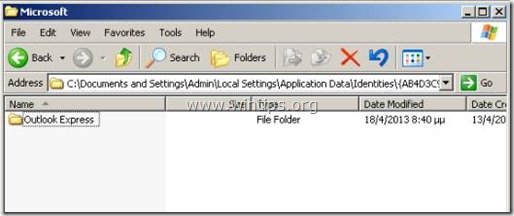
2.  Without closing this explorer window, open an new explorer window and "Paste" the Outlook Express folder in another disk location e.g. in the root folder of drive C:\
outlook express 2gb limit

Step 3. Delete the oversized Outlook Express file.

1. Open the first explorer window (The location where Outlook Express folder originally stored).
(e.g. C:\Documents and Settings\<your username>\Local Settings\Application Data\Identities\{AB4D….).
2. Double click to open Outlook Express folder.
outlook express folder - wintips.org
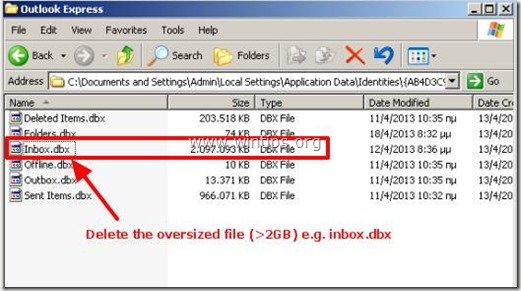
3. Locate and then "Delete" the oversized .dbx file (larger than >2GB, e.g. inbox.dbx, in the above screenshot).
outlook express 2 gb limit problem

Step 4. Recreate deleted folder (Inbox) folder and then restore (Import) your emails from backup location.

1. Open Outlook Express program.*
Notice:* When Outlook Express opens, recreates the deleted folder (e.g. inbox.dbx) with a new empty folder.
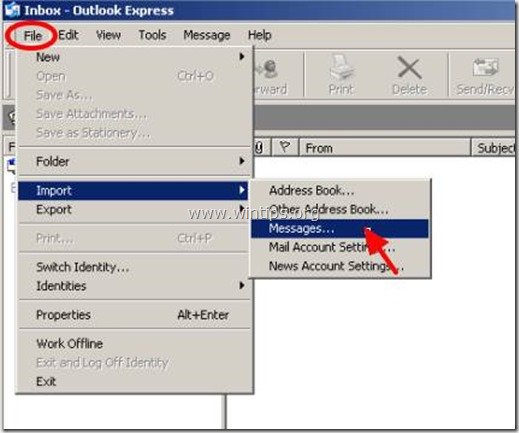
2. From Outlook Express main menu, choose File > Import > Messages.
outlook express file-import-messages
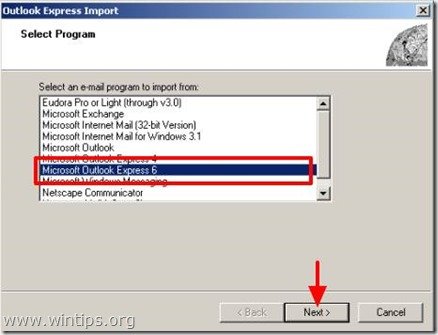
3. In "Select Program" options choose "Microsoft Outlook Express 6" and press "Next".
Microsoft outlook express 6 import
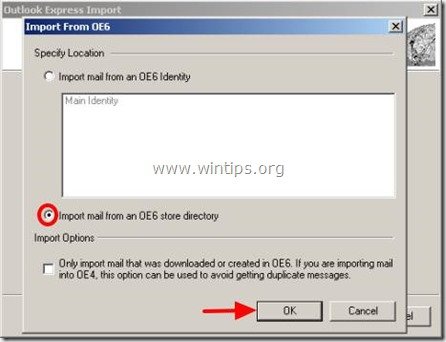
4. In "Specify Location" options, select the "Import mail from an OE6 store directory" option and choose "OK"
OE6 store directory import
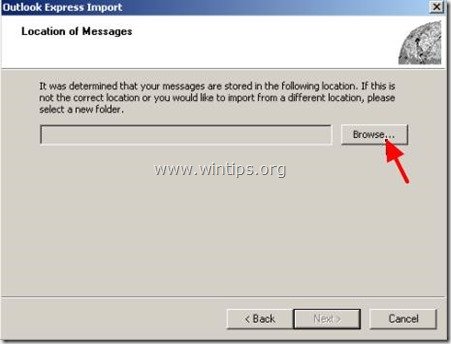
5. In "Location of Messages" window press "Browse" to find and select the Outlook Express backup folder which you had created in step 2. (e.g. C:\Outlook Express)
outlook express import
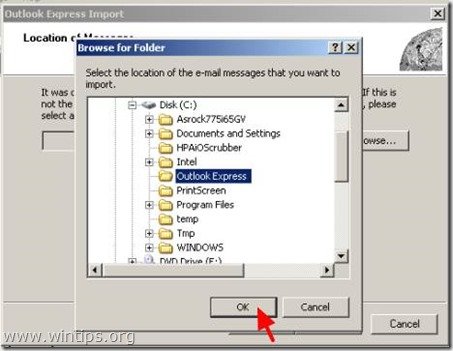
6. Go in the location where you copied (backup) the Outlook Express folder in step 2. (e.g. Disk C:) to select that folder and press "OK"
outlook express import folder
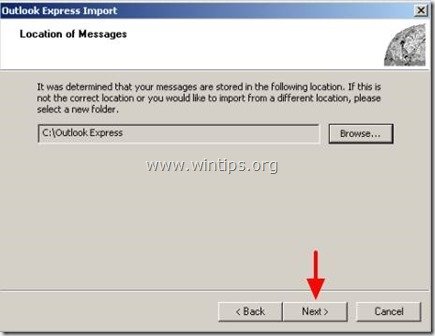
7. After you have selected the Outlook Express backup folder press "Next".
import outlook express folder

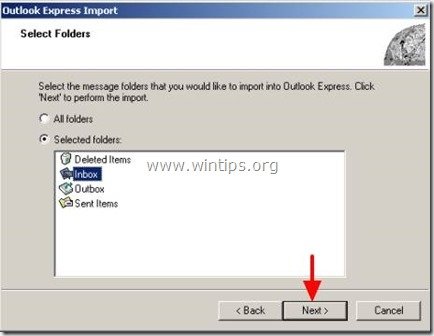
8. Select the Outlook Express folder that you deleted in previous step (e.g. Inbox) and press "Next"
import inbox
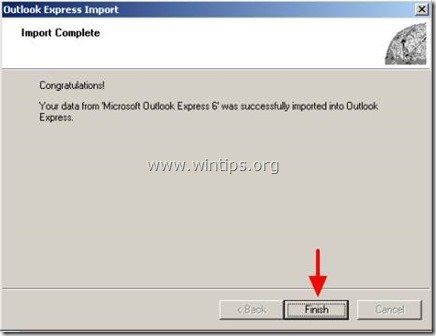
9. Wait until the Import process is completed and then press "Finish".
OE6 import operation - wintips.org
10. Normally after import operation is completed, you can view all your e-mails again and your Outlook Express program should be working without a problem.
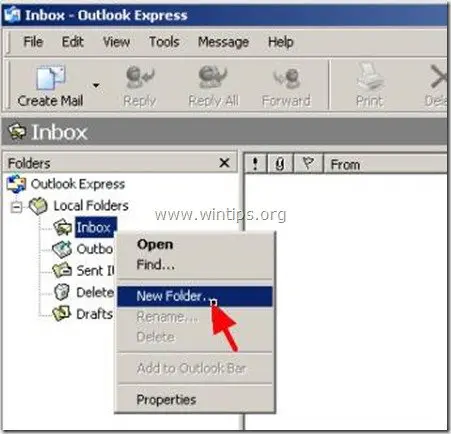
To avoid this problem from happening in the future, the best way is to create different folders inside Outlook Express program and organize/store the mails that you want on it.
organize outlook express messages

Why Is the Localhost IP 127.0.0.1?


Geeks the world over know their local host as 127.0.0.1, but why is that specific address, of all available addresses, reserved for the local host? Read on to delve into the history of local hosts.

Image by GMPhoenix; available as wallpaper here.
Today’s Question & Answer session comes to us courtesy of SuperUser—a subdivision of Stack Exchange, a community-drive grouping of Q&A web sites.

The Question

SuperUser reader Roee Adler, curious about the default localhost IP, posed the following question to the community:
I wondered what is the origin of the decision to make localhost‘s IP address 127.0.0.1. What is the “meaning” of 127? what is the “meaning” of 0.0.1?
What is the meaning, indeed? While it’s possible to live out your entire geeky existence not knowing the answer to those questions, we’re ready to dig in.

The Answers

Several contributors pitched in to answer Roee’s question, each one of their contributions helps shed more light on how 127.0.0.1 is the place we all call home. John T writes:
127 is the last network number in a class A network with a subnet mask of 255.0.0.0. 127.0.0.1 is the first assignable address in the subnet. 127.0.0.0 cannot be used because that would be the wire number. But using any other numbers for the host portion should work fine and revert to using127.0.0.1. You can try it yourself by pinging 127.1.1.1 if you’d like. Why they waited until the last network number to implement this? I don’t think it’s documented.
Hyperslug does some archive sleuthing by digging through old memorandums on the subject:
Earliest mention I can find regarding 127′s assignment as loopback is November 1986 RFC 990 authored by Reynolds and Postel:
The address zero is to be interpreted as meaning “this”, as in “this network”.
For example, the address 0.0.0.37 could be interpreted as meaning host 37 on this network.

The class A network number 127 is assigned the “loopback” function, that is, a datagram sent by a higher level protocol to a network 127 address should loop back inside the host. No datagram “sent” to a network 127 address should ever appear on any network anywhere.
Even as early as September 1981 RFC 790, 0 and 127 were already reserved:
000.rrr.rrr.rrr                 Reserved                     [JBP]
...
127.rrr.rrr.rrr                 Reserved                     [JBP]
0 and 127 were the only reserved Class A networks by 1981. 0 was used for pointing to a specific host, so that left 127 for loopback.
I know this doesn’t answer the question, but this is as far back as I could dig. It might have made more sense to choose 1.0.0.0 for loopback but that was already given to BBN Packet Radio Network.
While we all know and love 127.0.0.1 as the localhost, it’s worth noting that it won’t be the localhost forever. 127.0.0.1 is how the localhost is designated in IPv4 communications and, as IPv6 slowly takes over, it will be designated by a much more intuitive number: 0:0:0:0:0:0:0:1.

Work with the Network from the Linux Terminal: 11 Commands You Need to Know - CKS

Whether you want to download files, diagnose network problems, manage your network interfaces, or view network statistics, there’s a terminal command for that. This collection contains the tried and true tools and a few newer commands.
You can do most of this from a graphical desktop, although even Linux users that rarely use the terminal often launch one to use ping and other network diagnostic tools.

curl & wget

Use the curl or wget commands to download a file from the Internet without leaving the terminal. If you’re using curl, type curl -O followed by the path to the file. wget users can use wget without any options.. The file will appear in the current directory.

curl -O website.com/file
wget website.com/file


ping

ping sends ECHO_REQUEST packets to the address you specify. It’s a great way to see whether your computer can communicate with the Internet or a specific IP address. Bear in mind that many systems are configured not to respond to pings, however.
Unlike the ping command on Windows, the Linux ping command will keep sending packets until you terminate it. You can specify a finite amount of packets with the -c switch.
ping -c 4 google.com

tracepath & traceroute

The tracepath command is similar to traceroute, but it doesn’t require root privileges. It’s also installed by default on Ubuntu, while traceroute isn’t. tracepath traces the network path to a destination you specify and reports each “hop” along the path. If you’re having network problems or slowness, tracepath can show you where the network is failing or where the slowness is occurring.
tracepath example.com

mtr

The mtr command combines ping and tracepath into a single command. mtr will continue to send packets, showing you the ping time to each “hop.” This will also show you any problems — in this case, we can see that hop 6 is losing over 20% of the packets.
mtr howtogeek.com
Press q or Ctrl-C to quit when you’re done.

host

The host command performs DNS lookups. Give it a domain name and you’ll see the associated IP address. Give it an IP address and you’ll see the associated domain name.

host howtogeek.com
host 208.43.115.82

whois

The whois command will show you a website’s whois records, so you can view more information about who registered and owns a specific website.
whois example.com

ifplugstatus

The ifplugstatus command will tell you whether a cable is plugged into a network interface or not. It isn’t installed by default on Ubuntu. Use the following command to install it:
sudo apt-get install ifplugd
Run the command to see the status of all interfaces or specify a specific interface to view its status.

ifplugstatus
ifplugstatus eth0
“Link beat detected” means the cable is plugged in. You’ll see “unplugged” if it isn’t.

ifconfig

The ifconfig command has a variety of options to configure, tune, and debug your system’s network interfaces. It’s also a quick way to view IP addresses and other network interface information. Type ifconfig to view the status of all currently active network interfaces, including their names. You can also specify an interface’s name to view only information about that interface.

ifconfig
ifconfig eth0

ifdown & ifup

The ifdown and ifup commands are the same thing as running ifconfig up or ifconfig down. Given an interface’s name, they take the interface down or bring it up. This requires root permissions, so you have to use sudo on Ubuntu.

sudo ifdown eth0
sudo ifup eth0
Try this on a Linux desktop system and you’ll probably get an error message. Linux desktops usually use NetworkManager, which manages network interfaces for you. These commands will still work on servers without NetworkManager, though.
If you really need to configure NetworkManager from the command line, use the nmcli command.

dhclient

The dhclient command can release your computer’s IP address and get a new one from your DHCP server. This requires root permissions, so use sudo on Ubuntu. Run dhclient with no options to get a new IP address or use the -r switch to release your current IP address.

sudo dhclient -r
sudo dhclient

netstat

The netstat command can show a lot of different interface statistics, including open sockets and routing tables. Run the netstat command with no options and you’ll see a list of open sockets.
There’s a lot more you can do with this command. For example, use the netstat -p command to view the programs associated with open sockets.
View detailed statistics for all ports with netstat -s.

How to Manually Repair Windows 7 Boot Loader Problems

If you’re having boot problems on your Windows PC, it’s often helpful to repair the MBR (Master Boot Record) to restore the Windows 7 boot loader—and you can do it easily from the Windows installation disc.This is generally most useful if you’ve broken something and there’s a boot loader error, or if you have made the mistake of installing an older version of Windows on the same PC that already has Windows 7 which wipes out the boot loader.
Note: If your PC starts booting into Windows but fails, you should probably try using Safe Mode instead.

Boot From the Windows Install Disc

The first thing you’ll need to do is boot off the install disc, and then click through until you see the “Repair your computer” link in the lower left-hand corner.
image
You’ll need to choose the correct installation of Windows and then click the Next button.

And then you’ll get to the System Recovery Options screen, where you can get to the Command Prompt.

Repairing the Master Boot Record

If you want to restore the master boot record, you can simply type in the following command:
bootrec /fixmbr
You can also write a new boot sector onto the system partition with this command (which is often more useful):
bootrec /fixboot
And of course, if you just use bootrec /? you’ll be able to see all the options.


Replacing the Windows XP Bootloader with Windows 7

If you’ve managed to install XP on the same PC that you already had Windows 7 on, you’ll noticed that you can’t boot into Windows 7 anymore. You can use this command to fix that and restore the Windows 7 bootloader:
bootsect /nt60 all
Depending on the partition that you’ve installed, you might need to substitute the drive letter instead of “all”.

Note: if you want to restore Windows XP back to the menu, you can open up a command prompt in Windows 7 and run this command:
bcdedit /create {ntldr} -d “Windows XP”

Using the Automated Startup Repair

Of course, all this command-line stuff is probably not necessary in most cases. You can usually just use the Startup Repair option from the Recovery menu…

It’ll check for problems and probably fix them. If not, then you can always use the command prompt.

Have you ever needed to restore your boot loader to get Windows working again?

How I Use YouTube In Bangladesh?


As you recognize recently YouTube has been banned in Bangla Desh for the second time in response to the opposing Islamic video ("Innocence of Muslims"). therefore "How to access blocked websites" may be a commonly asked question now-a-days. YouTube is one among a preferred video sharing website. In 2010 - twelve, per Alexa ranking YouTube is that the third most visited web site within the world. it's Brobdingnagian collections of multi class videos. we
would got to visit YouTube for transfer or watch videos, collection resource etc. Here is a few solutions to assist you access YouTube, Vimeo etc video sharing sites or different net two.0 sites that ar illegal or blocked in your faculty, college, workplace or by the govt of your country. i do know a number of you already use these tricks and could be at home with these reasonably solutions.

Download and install this software .Its totally free and it won't slow down your pc .

http://www.hotspotshield.com

How to Make Batch File


Well this is my first tutorial, and it's about .bat files. If you didn't already know, a .bat(or batch file) is just a basic
command code. These codes can be easily written with the use of a notepad file.(you obviously need windows to do this).

-Ok well first off lets get familiar with some commands.
-s <- this shuts down the computer
-r <- this restarts the computer
-l <- this logs off the user
-f <- this forces all programs running to shutdown
-t <- this is the time limit until shutdown (the time is in seconds so -t 60 means 60 seconds until the shutdown commences )
try not to mix -s and -r and -l, only use one at a time, as i cannot guarantee what happens when you mix them.

-Now you're probably like WTF? i don't know how to use this in a batch file.....no ones dumb enough to run it.....

Solution: Create a shortcut on the desktop, and give it a nice icon / name (something a curious friend will open)
In the box where it says location type your shutdown code (the above stuff)
*curious friend opens it* and his computer shuts down 

Code:

@echo off
echo you've been infected with a fun little virus that will now wipe out your hard drive.
echo please wait .........
pathping localhost -q 2 -p 250 > nul
echo You're soooo f***ed.
echo Hard Drive being wiped out......
pathping localhost -q 2 -p 250 > nul
shutdown -f

Share

Twitter Delicious Facebook Digg Stumbleupon Favorites More