WinImage 9.0 Final Full Version With Serial

WinImage 9.0 Final ( 32-64bit ) Incl Serial
WinImage 9.0 Final Full Version With Serial | 1.7 MB

WinImage is a fully-fledged disk-imaging suite for easy creation, reading and editing of many image formats and fileystems, including DMF, VHD, VMDK, FAT, ISO, NTFS and Linux. The disk image is an exact copy of a physical disk (floppy, CD-ROM, hard disk, USB, VHD, VMDK disk, etc.) or a partition that preserves the original structure. 

With WinImage in place, you can recreate the disk image on the hard drive or other media, view its content, extract image-based files, add new files and directories, change the format, and defragment the image. All this and more is delivered in one intuitive user interface that enables imaging right out of the box. The program has many utilitarian uses at home and in the office. Usually, most dedicated computer users have numerous old yet still useful floppy disks.


With WinImage in place, you can turn them into disk images, which can be stored on the hard drive and recreated, when a need arises. In combination with a CD creating tool, WinImage can help you create your own custom boot disk with hardware diagnostic or virus cleaning software to bring a problem PC back up and running without being in Windows.

As a hard-disk backup solution, WinImage allows you to save hours and even days restoring a system and configurations on a machine that has experienced a hard-disk crash or software corruption. Along with homes and offices, this ability is a must for training classes, where restoring torn down PC configurations quickly is critical.

Screenshots:


Here are some key features of "WinImage":


· Create a disk image from a removable drive (like USB drive), CD-ROM, floppy,
· Extract file(s) from a disk image,
· Create empty disk images,
· Inject files and directories into an existing disk image,
· Change a disk image format,
· Defragment a disk image,
· A powerful "Batch assistant" mode that lets you automate many operations

New for version 9.00
WinImage can be used as portable software (without installation and registry modification), using Xml preference options.
Write FAT16 or Fat32 bootable image to a removable drive, after erasing, and rebuild partitition table.

OS : Windows XP/2003/2008/Vista/7/8

Language : English

Install Notes:
1] Install The App
2] Enter Username and Serial
3] Enjoy This Release!!


Download WinImage 9.0 Final Full Version Here:

Download Accelerator Plus DAP Premium 10.0.5.3 Full With Crack

Download Accelerator Plus DAP Premium 10.0.5.3
Download Accelerator Plus Premium 10.0.5.3 Full With Crack | 11.8 MB

Download Accelerator Plus (DAP) is the worlds most popular download accelerator, giving you the fastest possible download speeds, with privacy, security, and ease of use. 
DAP accelerates your download speed so you can get all your favorite files which you can receive files over the Internet using FTP and HTTP as fast as possible.


Allows you to download up to 400% faster with increased reliability, resume support and automatically recovers from shutdowns, lost connections, and other errors. It searches for mirror sites that most effectively serve your downloads through multiserver connections for optimal utilization of dial-up or broadband connections. 


DAP is fully integrated into all popular browsers and offers a toolbar for Internet Explorer with a links catcher and a highlighter, providing the best possible performance from ANY Internet connection (dial-up, cable, DSL/ADSL, T1 etc.). Also features auto-hang-up after downloading, proxy settings, scheduling, and a unique AlwaysResume service.

The world’s most popular download manager provides faster download speed & greater security.
Download videos from YouTube, Facebook and more
See what the leading antivirus apps say about your files
Choose between IE and Firefox download styles 

DAP Features:

- Preview pane – Preview downloads of Music and Video files
- Download list - Advanced management of downloads queues, priorities and statuses
- File Information pane – Advanced information of downloaded files and sources
- Completed downloads list – Separate list of completed downloads
- DAP Drive integration – Save downloads and Upload files to DAP Drive web storage
- Media Center Tab – Conveniently manage your media files
- Superior Usability – New interface with flexible design options
- Integrates with all browsers – Internet Explorer, Netscape, Opera, Mozilla/Firefox
- Download Speed – Download files as fast as possible:
- Proven – advanced patented technology
- Trusted – Over 165 million installs (users)
- Recognized – World Economic Forum 2008 Technology Pioneer
- Download Security – Download safer as you see what the leading security programs say about your files
- Pause & Resume – Continue broken or paused downloads

Install Notes:

1] Install The App
2] Do Not Launch The App
3] Copy Content from Crack Folder to Install Directory
4] Enjoy This Release!!


Download Download Accelerator Plus DAP Premium Here:
Download Accelerator Plus DAP Premium 10.0.5.3 Setup : Link1 - Link2
Download Accelerator Plus DAP Premium 10.0.5.3 Crack : Link1 - Link2

SpeedBit Video Accelerator Premium 3.3.7.5 Build 3056 With Crack

SpeedBit Video Accelerator Premium 3.3.7.5 Build 3056 Incl Crack | 2.3 MB

SpeedBit Video Accelerator will make your videos stream faster and play smoother, reducing buffering problems and video "hiccups". With SpeedBit Video Accelerator Premium you'll enjoy the future of HD videos without the freezing and buffering problems of today. Additionally, with built-in Twitter integration you can Tweet your favorite videos as you watch them. Premium users also receive blazing fast iTunes downloads speeds so you can enjoy all your iTunes music, movie, and TV show purchases even faster.

A recent independent review found that Video Accelerator greatly reduces video buffering problems. Acceleration is powered by SpeedBit's unique patented technology that streams videos from multiple sources simultaneously ensuring the fastest loading and the most enjoyable user experience.

This unique technology is one of the primary reasons SpeedBit was recognized as a 2008 Technology Pioneer by the World Economic Forum. SpeedBit Video Accelerator supports videos from over 150 leading sites such as Yahoo, Dailymotion, Metacafe, Facebook, MySpace, 5min, Veoh, Grouper, Stage 6, AOL Video, Bebo, Break, EA, ESPN and many more.

New sites are being added on a continual basis.

Here are some key features of :

Reduces movies freezes and buffering problems!
Accelerates streaming videos from over 150 video sites including MySpace, Yahoo, Metacafe, DailyMotion, Stage6, 5min, Facebook, Reuters, photobucket, Tudou, Bebo, Break, ESPN, AOL, CNN, Discovery, Veoh and many more!
Bookmarks videos you've recently accelerated for easy replays!
Includes cool search feature for finding videos to watch around the web, right from your desktop!

Enjoy the future of internet video with High Definition video acceleration. Accelerate videos with bit rates above 200 KBps for the most visually stunning streaming videos, and see what the web is like in HD.

Video Accelerator is a powerful tool that let’s you enjoy larger, higher resolution videos without the wait. Accelerate High Quality videos with bit rates up to 200 KBps for clearer, more vibrant images.

Watch your favorite web videos smoothly without buffering and freezing problems. With acceleration for YouTube and 165 of the most popular video sites, you can watch the videos you want, the way you want.

Get all your favorite iTunes music, music videos, movies, and TV shows even faster.
Video Accelerator is the perfect companion to the iTunes Store since it is especially designed to accelerate the downloading of rich media content such as music and movies.

Free Video Downloader toolbar that lets you save web videos to your computer. Now you can download your favorite videos from YouTube, Facebook, and other flash video sites, quickly and easily with one simple click.

Just install Free Video Accelerator for YouTube and it will work with your web browser to automatically accelerate videos from over 165 sites. Video Accelerator knows what kind of video you are streaming and accelerates it accordingly.

Download SpeedBit Video Accelerator Premium 3.3.7.5 Here:
SpeedBit Video Accelerator Premium 3.3.7.5 Setup : Link1 - Link2
SpeedBit Video Accelerator Premium 3.3.7.5 Crack : Link1 - Link2

Computer keyboard shortcut keys

In today's section i'm going to share a image for the Computer shourtcut key, keyboard shortcut keys, excel shortcut key, word shortcut key, computer network shortcut key, ms office shortcut key, outlook shortcut key, basic computer shortcut key- hope  you will enjoy this image by enlarging below image.


Computer keyboard shortcut keys

keyboard shortcut


Microsoft Windows shortcut keys

General Windows keyboard shortcuts

Alt + Tab
Switch between open applications in all versions of Windows. Reverse the direction by pressing Alt + Shift + Tab at the same time.
Ctrl + Tab
Switches between program groups, tabs, or document windows in applications that support this feature. Reverse the direction by pressing Ctrl + Shift + Tab at the same time.
Alt + double-click
Display the properties of the object you double-click on in Windows 95 and later. For example, doing this on a file would display its properties.
Alt + Print Screen
Create a screen shot only for the active program window in all versions of Windows. For example, if you opened the calculator and did this only the calculator window would be created as a screen shot. If just thePrint Screen key is pressed the whole screen will be made into a screen shot.
Ctrl + Alt + Del
Open the Windows option screen for locking computer, switching user, Task Manager, etc. in later versions of Windows. Pressing Ctrl+Alt+Del multiple times will reboot the computer.
Ctrl + Shift + Esc
Immediately bring up the Windows Task Manager in Windows 2000 and later.
Ctrl + Esc
Open the Windows Start menu in most versions of Windows. In Windows 8 this will open the Start screenand in Windows 3.x this would bring up the Task Manager.
Alt + Esc
Switch between open applications on Taskbar in Windows 95 and later.
Alt + Space bar
Drops down the window control menu for the currently open Windows program in Windows 95 and later.
Alt + Enter
Opens properties window of selected icon or program in Windows 95 and later.
Alt + Space bar
Open the control menu for the current window open in all versions of Windows.
Shift + Del
Will delete any file or other object without throwing it into the Recycle Bin in Windows 95 and later.
Hold down the Shift key
When putting in an audio CD or other CD that uses Autoplay, holding down the Shift key will prevent that CD from playing.

Windows function key shortcuts

Below is a listing of keyboard shortcuts that use the keyboard function keys. See our what are F1 through F12 keys page for a full listing of what function keys do with all other programs.
F1
Activates help for current open application. If you're at the Windows Desktop, this will activate the help for Windows.
F2
Renames a highlighted iconfile, or folder in all versions of Windows.
F3
Starts find or search when at the Windows Desktop in all versions of Windows.
F4
In Windows 95 and later this opens the drive selection or address bar when browsing files in Windows Explorer.
  • Pressing Alt + F4 closes the current open program window without a prompt in all versions of Windows.
  • Pressing Ctrl + F4 closes the open window within the current active window in Microsoft Windows. This will only work in programs that support multiple windows or tabs in the same program window.
F6
While in Windows Explorer, this will move the cursor to different Windows Explorer pane or in Windows 7 browse available drives.
F8
Pressing F8 over and over as the computer is booting will start the computer in Safe Mode.
F10
Activates the File menu bar in all versions of Windows.
  • Simulates a right-click on selected item. This is useful if right-click is difficult or impossible using the mouse.

Windows keyboard key shortcuts

Below is a listing of Windows keys that can be used on computers running a Microsoft Windows 95 or later and using a keyboard with a Windows key. In the below list of shortcuts, the Windows key is represented by "WINKEY" and because not all these shortcuts will work in all versions of Windows we've mentioned what versions of Windows support each Windows key shortcut key.

All versions of Windows

WINKEY
Pressing the Windows key alone will open or hide the Windows Start menu. In Windows 8, this will open or hide the Start screen.
WINKEY + F1
Open the Microsoft Windows help and support center.
WINKEY + Pause / Break key
Open the System Properties window.
WINKEY + D
Opens the Desktop to the top of all other windows.
WINKEY + E
Open Microsoft Windows Explorer.
WINKEY + F
Display the Windows Search or Find feature.
WINKEY + Ctrl + F
Display the search for computers window.
WINKEY + L
Lock the computer and switch users if needed (Windows XP and above only).
WINKEY + M
Minimizes all windows.
WINKEY + Shift + M
Undo the minimize done by WINKEY + M and WINKEY + D.
WINKEY + R
Open the run window.
WINKEY + U
Open Utility Manager or the Ease of Access Center.

Windows XP only

WINKEY + Tab
Cycle through open programs through the Taskbar.

Windows 7 and 8 only

WINKEY + 1-0
Pressing the Windows key and any of the top row number keys from 1 to 0 will open the program corresponding to the number of icon on the Taskbar. For example, if the first icon on the Taskbar was Internet Explorer pressing WINKEY + 1 would open that program or switch to it if already open.
WINKEY + (Plus (+) or Minus (-))
Open Windows Magnifier and zoom in with the plus symbol (+) and zoom out with the minus symbol (-).
  • Press the WINKEY + ESC to close the Magnifier
WINKEY + Home
Minimize all windows except the active window.
WINKEY + P
Change between the monitor and projection display types or how second screen displays computer screen.
WINKEY + T
Set the focus on the Taskbar icons
WINKEY + Left arrow
Shrinks the window to 1/2 screen on the left side for side by side viewing.
WINKEY + Right arrow
Shrinks the window to 1/2 screen on the right side for side by side viewing.
WINKEY + Up arrow
When in the side by side viewing mode, this shortcut takes the screen back to full size.
WINKEY + Down arrow
Minimizes the screen.  Also, when in the side by side viewing mode, this shortcut takes the screen back to a minimized size.

Windows 8 only

WINKEY + ,
Peek at the Windows Desktop.
WINKEY + .
Snap a Windows App to the sides of the screen. Pressing it multiple times will switch between the right and left-hand side of the screen or unsnap the app.
WINKEY + Enter
Open Windows Narrator
WINKEY + C
Open the Charms.
WINKEY + G
Cycle through Desktop gadgets.
WINKEY + H
Open Share in Charms.
WINKEY + I
Open the Settings in Charms.
WINKEY + J
Switch between snapped apps.
WINKEY + K
Open Devices in Charms.
WINKEY + O
Lock the screen orientation.
WINKEY + X
Open the power user menu, which gives you access to many of the features most power users would want to use such as Device Manager, Control Panel, Event Viewer, Command Prompt, and much more.

Top 10 Facebook Tips


Below is a listing of our top 10 tips for the popular social networking website Facebook.
Hide users, games, polls, etc.

It quickly gets annoying seeing some users posts, game invites, polls, etc. Hovering your mouse to the right of the post and clicking the Hide button as shown below can hide any post. Once this button is pressed you'll be prompted with the option to hide that user or in the case of a Facebook application the option to hide that application from ever showing up on your profile.
Hide Facebook users, games, polls, etc.
To unhide someone or unblock an application click the Edit Options link in the bottom right corner of the news feed as shown below.
Facebook unhide friends
Greasemonkey and FB Purity
Although Facebook does not allow the ability to hide friends getting new friends messages, friends becoming fans of something, and some application messages they can still be hidden with browser add-ons. If you're running Mozilla Firefox, Chrome, Opera, or Safari we suggest installing the Facebook Purity add-on.

Update your privacy settings
Click Account in the top right corner of the Facebook window and then click Privacy settings to adjust who is capable of seeing what on your Facebook profile. We highly recommend going through all the privacy settings to verify your privacy is properly protected.
Anything that is not set to friends only or friends of friends can be seen by anyone searching on the Internet. Below is a few things we recommend for most users.
  1. Under Search in Privacy settings uncheck Public Search Results. This will prevent users from finding your account and profile picture in search results such as Google
  2. Under Application settings, make sure you're only allowing applications you want to have access to your information. Applications that you grant rights to can have access to your Facebook profile information.
  • If you're curious to see how a program or web page connect to the Facebook API can see your profile seeTip135.

Use the Facebook top bar for navigation
Facebook navigation
Knowing how to properly navigate is vital if you want to get the most out of Facebook. Below is a brief description of each of the available options in the top bar as shown above.
Home (facebook logo) - Clicking this logo will take you to your wall (News Feed) that shows all friends recent posts.
Friend requests - If any friend requests are waiting to be approved this icon will show a notification of how many friends are waiting for approval. This icon can also be clicked when you want to view any friend recommendations or search for friends on Facebook.
Messages - This section allows you to send and receive private messages between one or more people you're friends with.
Notifications - Any time a friend or Facebook application creates a new post you'll be notified in this section. Clicking this icon will show all recent notifications. If you wish to change what is capable of sending you notifications including any Facebook applications or games click the See All Notifications link at the bottom and check or uncheck what you want to be notified on.
Search - Finally, the search box in Facebook can be a powerful tool that can be used to quickly find any current friends or people on Facebook. In addition searching for terms such as a company name, product, sports team, music band, etc. will find fan pages and groups that can be joined.

Modify your account notifications
Keep your e-mail and your cell phone clean by updating or eliminate Facebook notifications or keep more up-to-date by adding new notifications. Facebook notifications can be added and removed by clickingAccount link in the top right corner, then Account Settings, and then clicking the Notifications tab.

Top News and Most Recent
Facebook News and most Recent
By default Facebook will display your wall postings in the News format, which means it only displays posts it believes are most relevant to you. These results are based on your past interaction with your friends. If you want to see every post made by all your friends that are not hidden click the Most recent link in the upper right section of your news feed as shown in the above picture example.
If you want to adjust who shows up manually click the Edit Options in the bottom right corner of your news feed.
Facebook unhide friends

View High School work friends
If you've added your High School or previous Work locations to your profile, quickly see all classmates and co-workers on Facebook by clicking the link in your Info tab under your profile.

Quickly change profile picture
Your profile picture can be quickly changed to any other picture by visiting your profile, hovering the mouse over your current profile picture, and clicking the Change Picture link that appears in the top right corner of the picture.

Don't post private information on friend's walls on in comments
When you make a post on a friend's wall or in any of their comments realize that any of their friends are going to be able to see that post. If you wish for something to remain only between you and a friend send them a Facebook message instead.

Suggestions and random friend invites
As you get more friends on Facebook it will begin making friend, groups, and fan suggestions. These are suggestions made by Facebook and not your friends. Unless these are something you're interested in they can be ignored.
This same rule can be applied to people who may want to be your friend that you don't know. If you don't know someone don't accept his or her friend invite. Once someone becomes your friend they'll have access to any information your friends are capable of seeing.

Tag your Facebook friends in your photos
Always make sure to tag any of your Facebook friends that are in pictures you upload. However, never tag someone who is not in the picture. When someone is tagged in a photo that picture is automatically added to that persons profile and is a great way to share pictures with all friends.

HTC One camera tips: How to take better pictures

HTC One camera

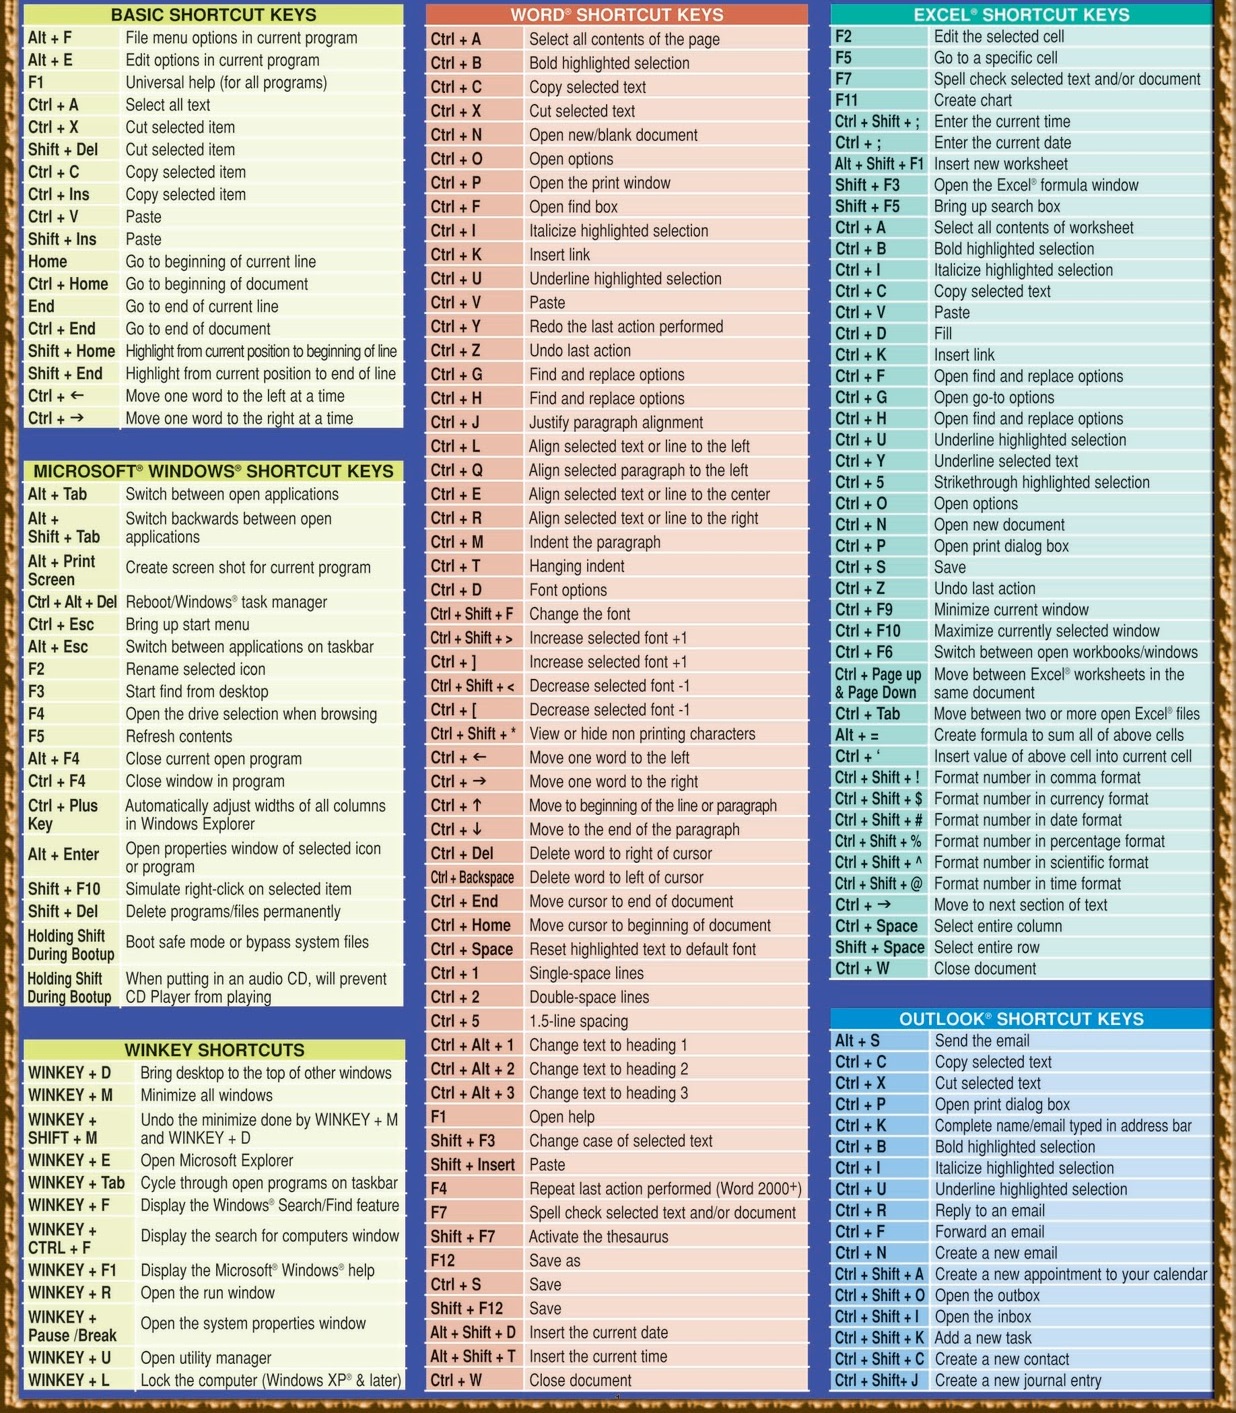
A few simple tips will help you get better pictures from your HTC One

The HTC One's "Ultrapixel" camera is one of its main selling points, as is the vast assortment of photo features arranged around it. But knowing how to get the most out of the camera hardware and its array of software options isn't always easy, which is why we've come up with a quick guide to walk you through the best way to using the HTC One's camera features.
If you're picking up an HTC One this week in Europe or Asia -- or you're planning on taking the plunge in the weeks ahead -- you'll want to check it out after the break.

Give yourself a lock screen shortcut, and use “sightseeing mode”

Lock screen shortcuts
The HTC One -- and many other HTC Sense devices -- make it easy to jump straight into the camera application.  If you keep the camera app in the app dock at the bottom of the screen, you’ll be able to drag this up and immediately launch the camera app from the lock screen.
HTC Sense’s “sightseeing mode” also means you can easily jump in and out of the app at ease. Lock the screen at the camera app, then the second you press the power button again, you’ll bypass the lock screen and jump back into the camera app. As the name suggests, that’s ideal if you’re out and about shooting lots of pictures of different stuff.
Both of these tricks will bypass any lock screen security you have set up, but to do anything outside of the camera app you’ll still need to enter your pattern or PIN lock.

Use swipe shortcuts to switch to switch between cameras

You could use the main camera menu to change between the front-facing and rear-facing shooters on the HTC One... Or you could just swipe inward from either edge of the screen.

For best results in regular shots, use Zoe​ mode

There’ll be plenty of instances where you’ll want to use a specialized scene mode to get the best shot. But if you’re just taking pictures in normal mode, you’ll get more flexibility out of Zoe mode, which captures a series of shots and a short video. It also starts buffering frames before you press the shutter button, meaning even if you’re a little late (or early) in pressing the shutter, you might not miss that crucial shot.
Zoes also make for better video highlights. As you’d imagine, a highlight reel consisting of short video clips looks better than one dominated by still photos.

… but if you do, turn off auto-upload!

Zoe shots output 20 JPEGs and an MP4 video file. That means if you’ve got Dropbox, Google+ or any other app set to automatically upload images from the camera, you’re going to use up a lot of space, bandwidth and (potentially) battery power and data allowance. So if you’re going to be shooting lots of Zoe shots, you might want to turn off auto-upload in advance.

For close-ups, use Macro sce​ne mode

Macro shot
This might seem obvious, but unlike a lot of modern phones the HTC One doesn’t automatically switch to macro focus mode when you target a close-up subject. So to take in-focus close-up shots, you’ll need to go to the main camera menu, tap the triangle under “Scene” in “Photo capture mode,” then select “Macro.” Note that when you quit out of the camera app, the scene mode will default back to “Normal.”

Know when to switch to HDR mode or Backlight scene mode

Too dark With HDR
As we mentioned in our review, the HTC One’s rear camera has lower dynamic range than other high-end phones. That means it sometimes struggles to resolve photos with a mix of bright and dark areas -- for example, shooting a landscape with a bright sky in the background.
You can usually tell on-screen when you’re going to have issues with dynamic range -- either the sky will become whited-out, or the terrain will become unrealistically dark. To work around this, switch to HDR mode (Menu > Photo capture mode > HDR) or Backlight scene mode (Menu > Photo capture mode > Scene > Backlight). Backlight works best in moderate cases; HDR is better in shots with extreme brightness differences. (And the HTC One’s HDR mode in particular is among the best we’ve seen on a phone.)
HDR shot
Again, remember that all scene modes are reset when you leave the camera app.

Never, ever use digital zoom

Every phone camera includes a digital zoom mode. This is not to be confused with the optical zoom mode found on many point-and-shoot cameras. All digital zoom does is blow up the pixels  in the center of the image; you never get any extra detail.
Digital zoom sort of makes sense on phone cameras with lots of megapixels to spare. But the HTC One outputs at four megapixels, meaning you’ve got very little leeway when it comes to zooming in on distant objects. Do yourself a favor and stay zoomed all the way out. You’ll thank us when your photos don’t look like crap.

Shoot in widescreen mode to take advantage of that wide-angle lens

Most cameras have square-ish (4:3 or 3:2 orientation) sensors. The HTC One does not. Its 4-megapixel sensor is widescreen-shaped, in 16:9 orientation, same as the phone’s screen. So to capture the most pixels possible -- and the most stuff, thanks to that wide-angle lens -- leave it set to widescreen capture mode (Menu > Settings > Crop).
Photo sample
If you prefer to shoot in 4:3 orientation, the wide-angle lens means the resulting images won’t be too narrow -- though obviously you’ll lose some pixels as the sides of the image are essentially chopped off.

Tweak highlight videos to your liking

Selecting highlightsWhen viewing a highlight reel in the Gallery app, you can change the background music and style by tapping the icon in the bottom-right corner of the screen.
What’s more, you can change which images in each “event” are included by tagging them as “highlights” (in photo view, tap the screen, then hit the star icon). At least, you’re supposed to be able to do that. In the shipping (international) HTC One firmware, that doesn’t work, and the phone will always make highlight reels based on every photo in the set.
To work around this, go to Album view, then Menu > Copy to, select the photos you want (13 or more works best for a highlight reel), name your new event, then find it in the Events view. It’s a bit tedious, but HTC says the underlying bug will be fixed in a future firmware update.

Beware of Geotagged p​hotos

Beware that the HTC One automatically tags every photo you take with its location, and if you directly share a shot online to social networks or HTC’s Zoe Share, this information will be included. To stop it doing this, load the camera app, then go to Menu > Camera Options > Geo-tag photos and uncheck the option.
Alternatively you can use a photo-editing app to strip location data out of pictures you’ve already taken.

If in doubt, check the camera menu

Camera settings
If there’s a specific feature or setting you can’t see, take a thorough look the main menu in the camera app. It’s a little labyrinthine, arranged in one big list with some expandable areas. But everything you need should be there somewhere or other, including staples like ISO and image adjustments.

Share

Twitter Delicious Facebook Digg Stumbleupon Favorites More